
WoodItGood is supported by its readers. We may earn an affiliate commission at no extra cost to you if you buy through a link on this page.
If you’re on the hunt for wood Christmas tree patterns, you’ve come to the right place!
Whether you’re ready to swap out that ol’ plastic tree for something handmade or just looking to add a little rustic charm to your decor, I’ve got plenty of ideas that’ll have you feeling festive in no time.
From sleek, modern designs to whimsical, rustic creations, these wood Christmas tree patterns are perfect for anyone wanting to craft a cozy, personal touch for the holidays.
So grab your saw, some wood, and a cup of hot cocoa, and let’s start building some Christmas cheer, one tree at a time!
Rustic Meets Modern: A Wooden Slat Christmas Tree That Shines Bright!

Well, ain’t this a beauty?
This modern wooden slat Christmas tree is just the thing for folks lookin’ to keep things simple but still festive as can be!
Built with horizontal slats stacked at angles, this tree gives off a real sleek and rustic vibe.
Don’t you think snowflakes, reindeer, stars, and tiny wooden house wood ornaments add just the right touch of charm?
And when you wrap those twinkle lights around it, it’ll glow brighter than a candle in the window on Christmas Eve!
Skills or Techniques Learned:
You’ll get to practice cuttin’ your wood slats nice and even, sanding ’em smooth, and stacking them to create that traditional tree shape. And if you’ve been itchin’ to show off your decorating skills, this project’s just the ticket!
Materials/Tools Needed:
- Wooden slats (varied sizes)
- Screws or nails
- Sandpaper
- String lights
- Wooden ornaments (or homemade ones if you’re feelin’ crafty!)
Estimated Time to Complete:
Set aside about 3-4 hours, dependin’ on how big you go with this one.
Simple Wooden Triangle Tree

If you’re lookin’ for a quick and easy project that still brings a heap of charm, this simple wooden triangle tree is just the ticket!
With its clean lines and minimalist design, it’s perfect for small spaces or to add a little touch of Christmas on a mantel or side table.
The open triangle shape lets you get creative with how you decorate it, maybe some twinkling lights, tiny ornaments, or even a bit of greenery tucked in.
Best part? It’s sturdy and solid enough to stand on its own, no fuss!
Skills or Techniques Learned:
You’ll sharpen your skills with basic cuts, assembly, and sanding. This one’s all about precision and clean lines!
Materials/Tools Needed:
- Wooden boards
- Nails or wood glue
- Sandpaper
- Wood finish (optional, for a polished look)
Estimated Time to Complete:
This little tree can be done in about an hour or two, perfect for a quick weekend project.
Pro Tip: If you want to jazz it up, consider painting it a bright holiday green or leaving it natural for a rustic look that fits right into any decor. And don’t forget to sand those edges for a nice, smooth finish!
If you want to have access to all the woodworking plans you could possibly need, why don’t you check this out?
Twisted Spiral Wood Christmas Tree

Now, if you’re feelin’ a little adventurous this holiday season, why not try your hand at this unique spiral wood Christmas tree made from just one 2×4?
This beauty spins its way to the top with a series of carefully cut pieces that stack in a gorgeous spiral. It’s eye-catching, fun, and sure to be a conversation starter.
Plus, it’s a great way to show off those woodworking chops! You’ll need a little extra patience to get those cuts just right, but once it’s together, you’ll have a tree that’ll make folks stop and stare.
Skills or Techniques Learned:
This one’s a great project for practicing your precise cuts and learning how to assemble a spiral pattern. You’ll also work on balancing and creating a sturdy base for all those twists!
Materials/Tools Needed:
- One 2×4
- Drill and screws
- Sandpaper
- Measuring tape
- Wood finish or stain (optional for that polished look)
Estimated Time to Complete:
Set aside a good 3-5 hours, depending on how fast you work with all those cuts.
Pro Tip: Make sure to measure each cut carefully to get that perfect spiral effect. And for a little extra flair, consider staining the wood a rich color to make those twists really pop!
Whoville-Inspired Christmas Tree Wood Cutout

Well, if this ain’t the cutest thing!
This Whoville-inspired Christmas tree wood cutout is just the ticket for adding a dash of whimsy to your outdoor decor.
With its swoopy curves and layers of snow, this tree looks like it came straight from Dr. Seuss’ world. Perfect for a front yard display or even indoors if you’ve got the space!
You’ll be painting this one up with bright green and white snowy layers, making it a festive and fun project for the whole family.
Skills or Techniques Learned:
You’ll work on tracing, cutting out smooth curves, and painting details to bring this tree to life. Great for practicing your jigsaw or scroll saw skills!
Materials/Tools Needed:
- Plywood sheet
- Jigsaw or scroll saw
- Sandpaper
- Outdoor paint (green, white, and blue)
- Wood sealer for protection
Estimated Time to Complete:
Plan for about 4-5 hours, including painting and letting it dry (at least for the first one. You’ll get faster the more you make).
Pro Tip: To make sure this cutout lasts through the winter, give it a good coat of outdoor wood sealer after painting. That’ll keep it lookin’ bright and cheery all season long!
Intricate Laser-Cut Christmas Tree Ornaments

Now, here’s a project that’s as fancy as it is festive!
These intricate, laser-cut Christmas tree designs are perfect for adding a touch of elegance to your holiday decor.
With beautiful swirling patterns and cut-out shapes like snowflakes and bells, this is a great project for those who love the finer details.
Though this one calls for a laser cutter, the pattern comes with a PDF version, too. So if you take your time you can make these with a scroll saw.
It’ll take you some time but the results are downright stunning and make a great addition to your mantle or tabletop display. If you’re a fan of modern meets traditional, this one’s for you!
Skills or Techniques Learned:
This is a perfect opportunity to dive into laser cutting or refine your scroll saw skills if you’re cutting by hand. You’ll also work on precision sanding to get those smooth edges.
Materials/Tools Needed:
- 3mm plywood (1/8 inch)
- Laser cutter or scroll saw
- Sandpaper for finishing
- Wood finish or paint (optional)
Estimated Time to Complete:
About 1-2 hours, depending on how you cut and finish.
Pro Tip: After cutting, give these trees a light sanding, you can even add a bit of color to really make those intricate designs pop!
Christmas Tree Bundle with 10 Designs

This bundle comes with 10 unique Christmas tree designs, each one more beautiful than the last.
Whether you’re into snowflakes, swirls, or even little holiday scenes, these trees are perfect for sprucing up your holiday decor in style.
They stand on their own and are easy to assemble, making them great for tabletops, mantles, or even as gifts.
With a mix of intricate laser-cut details and bold shapes, you’ll have plenty of options to create a festive look that’s sure to impress.
Skills or Techniques Learned:
This project is all about precision cutting and assembling. You’ll practice cutting out detailed designs, sanding edges smooth, and putting it all together for a finished look.
Materials/Tools Needed:
- Plywood or MDF
- Laser cutter or scroll saw
- Sandpaper
- Paint or wood stain for a custom finish
Estimated Time to Complete:
Each tree can take about 1-2 hours, but with 10 designs, you’ve got plenty to keep you busy all weekend long!
Pro Tip: Mix and match colors to make these designs pop! Try layering different shades of paint or wood stain (learn more about the different stains here!) to add depth and dimension to your holiday display.
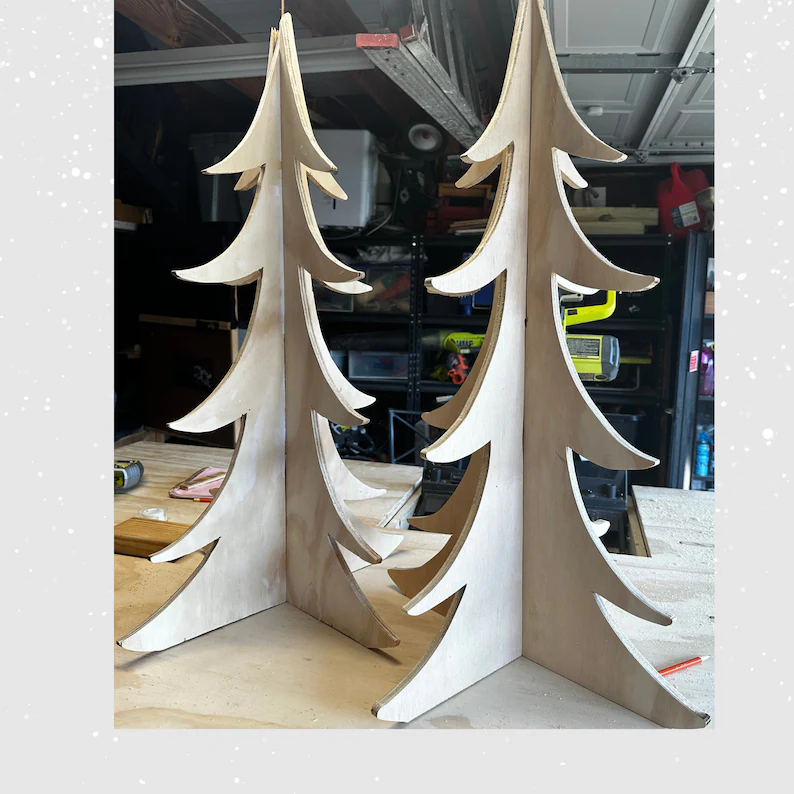
Modern Wooden Branch Christmas Tree

Now, if you’re lookin’ for something that stands out and adds a bit of modern flair to your holiday decor, this wooden branch Christmas tree is a real showstopper!
With its unique, branch-like design, it’s both artsy and functional. You can hang colorful ornaments on each “branch,” or leave it bare for that minimalist look.
It’s sturdy and perfect for small spaces, but still makes a big impact in the room. Plus, it’s a great way to showcase your woodworking skills!
Skills or Techniques Learned:
You’ll get to practice precision cutting and shaping those branches just right. Assembly is key, as this design needs to be both sturdy and balanced for hanging those ornaments.
Materials/Tools Needed:
- Plywood or MDF
- Jigsaw or scroll saw
- Sandpaper
- Wood glue or screws
- Ornaments for decorating
Estimated Time to Complete:
Set aside 3-4 hours, especially if you’re adding extra ornaments and finishing touches.
Pro Tip: mFor a little extra pizzazz, consider staining or painting the branches in a bold color to really make the tree pop. And don’t forget to use a sturdy base so it stands strong, even with all those ornaments hangin’ on!
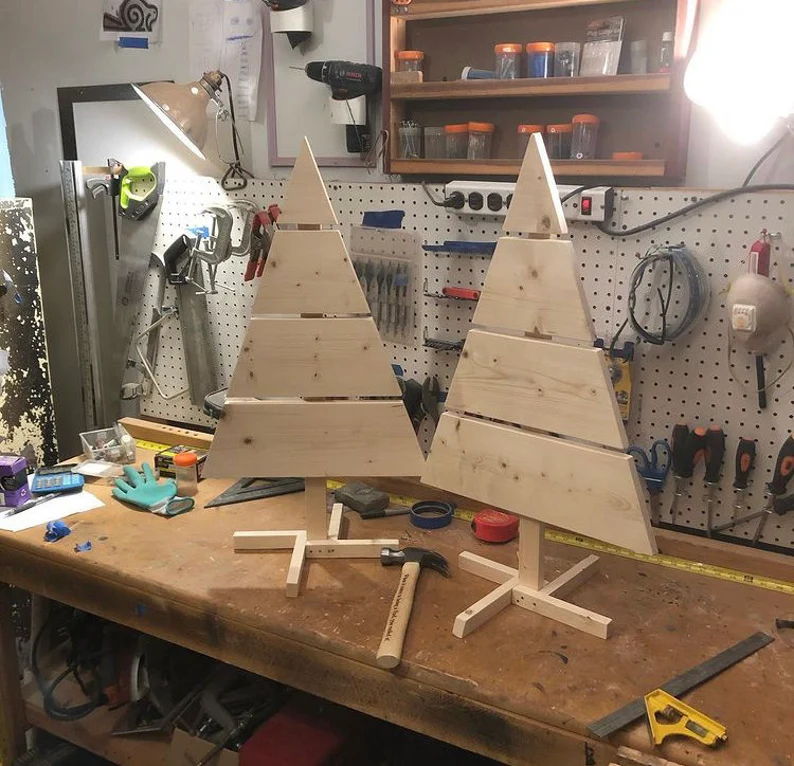
Outdoor Rustic Christmas Trees

Well now, if you’re ready to spruce up your yard for the holidays, these outdoor rustic Christmas trees are just the ticket!
Made from layered wooden slats, these trees are a perfect blend of simple and sturdy. They bring a cozy, farmhouse vibe to your outdoor space.
You can leave the wood natural for that rough-hewn look, or slap on some paint for a festive pop of color.
Add a star on top and a little wreath or garland, and you’ll have yourself a rustic display that’ll have the neighbors peekin’ over the fence to get a better look!
Skills or Techniques Learned:
You’ll practice cuttin’ and stackin’ slats, and get a chance to work on sanding and painting for that perfect finish. It’s also a great way to fine-tune your outdoor woodworking skills!
Materials/Tools Needed:
- Wooden slats
- Screws or nails
- Sandpaper
- Paint or stain (optional)
- Decorative star or wreath for that finishing touch
Estimated Time to Complete:
Plan for about 3-4 hours, depending on how detailed you want to get with your decorations.
Pro Tip: To make sure your trees hold up against winter weather, give ‘em a good coat of outdoor sealant. It’ll keep that wood looking fresh and prevent any warping from rain or snow!
3D Christmas Pine Tree Laser Cut Bundle

Now, if you want to add a little 3D magic to your Christmas decor, these 3D Christmas pine trees are just the thing! This bundle comes with 10 different designs, each one more intricate and charming than the next.
Perfect for a centerpiece or to display on your mantle, these little trees pop together like a puzzle, thanks to precision laser cuts.
The snowflake branches give off that delicate, wintery feel while still being sturdy enough to hold their shape.
It’s a modern take on a classic Christmas tree, and let me tell you, it’s gonna be a crowd-pleaser!
Skills or Techniques Learned:
This project is all about assembly and working with precision-cut pieces. Whether you’re using a laser cutter or hand cutting, you’ll practice getting those interlocking pieces to fit snug as a bug!
Materials/Tools Needed:
- Plywood or MDF (3mm thickness works great)
- Laser cutter or scroll saw
- Sandpaper for smooth edges
- Wood glue (optional, for extra security)
Estimated Time to Complete:
About 1-2 hours for each tree, depending on how detailed you want to get with the finishing touches.
Pro Tip: For a little extra flair, try painting or staining the individual pieces before assembly. You could even change up the colors this way without getting one color on another, if you follow me. This will give your trees some extra dimension and really make ‘em stand out on display!
Giant Wooden Christmas Tree Cutout (3ft to 9ft)

Now, if you’re lookin’ to go big this Christmas, this giant wooden Christmas tree cutout is just what you need!
Ranging in size from 3 feet all the way up to a whopping 9 feet, this tree can be the perfect standout piece for your yard or even indoors if you’ve got the space.
It’s a simple project: just print out the template, trace it onto your plywood, cut it out, and paint it up! You can even add lights for that extra festive glow.
This one’s great for folks who want something easy to make but impressive to look at.
Skills or Techniques Learned:
You’ll practice tracing, cutting large shapes, and sanding down those edges for a smooth finish. It’s a great project for improving your basic woodworking skills on a grander scale!
Materials/Tools Needed:
- Plywood (depending on your chosen size)
- Jigsaw or scroll saw
- Sandpaper
- Paint or stain
- Optional: lights to decorate!
Estimated Time to Complete:
Plan for 2-4 hours, depending on the size of the tree and how detailed you get with painting.
Pro Tip: To really make this tree pop, outline it with string lights once you’re done painting. You can use outdoor lights if you’re putting it in the yard, and don’t forget to seal the wood for protection against the elements!
Mini Wooden Christmas Trees
Well, aren’t these mini wooden Christmas trees just adorable? They’re perfect for adding a little festive charm to your home, whether you use them as centerpieces, line them up on your porch, or gift them to friends.
These trees are made from stacked wooden boards in different sizes to create that classic Christmas tree shape.
They’re sturdy, simple to make, and the perfect project if you’re looking to create something that’ll last for years to come!
Skills or Techniques Learned:
You’ll work on precision cutting, stacking, and assembling wooden pieces. This project is great for fine-tuning your sanding and painting skills, too!
Materials/Tools Needed:
- Wooden boards of various sizes
- Screws or nails
- Sandpaper
- Paint or stain (optional)
Estimated Time to Complete:
You’ll need about 2-3 hours per tree, depending on how fancy you get with the finishing touches.
Pro Tip: These trees look great left natural, but if you’re feelin’ extra festive, paint ’em up in holiday colors! A little star on top and maybe some garland or lights will really make ‘em shine.
Curved Wooden Ornament Holder

Now, if you’re lookin’ for something small but absolutely charming, this curved wooden ornament holder is a perfect little project.
With its simple, flowing design, it’s a stylish way to display a special Christmas ornament. The curved wood holds the ornament up beautifully, and the base keeps everything nice and steady.
This is an ideal project if you’ve got a laser cutter handy, but it’s also doable with a scroll saw.
Whether you keep it natural or stain it for a richer look, this piece is sure to stand out on any holiday display!
Skills or Techniques Learned:
You’ll practice cutting smooth curves and working with precision to create a clean, elegant design. This project is great for fine-tuning your detail work!
Materials/Tools Needed:
- Wood (5mm or 6mm thickness works best)
- Laser cutter or scroll saw
- Sandpaper
- Wood finish or stain (optional)
Estimated Time to Complete:
About 1-2 hours, perfect for a quick but satisfying project.
DIY Tabletop Christmas Tree

If you’re lookin’ for a small project that packs a big festive punch, this DIY tabletop Christmas tree is just perfect!
With its curvy, whimsical design and an opening to display a colorful ornament, it adds a touch of holiday cheer to any room.
This tree fits nicely on a mantel, a table, or even as a centerpiece. It’s small, stylish, and super fun to make, whether you keep it natural or paint it up for extra holiday flair!
Skills or Techniques Learned:
You’ll practice cutting smooth, intricate curves and sanding down edges for a clean finish. This one’s a great project to refine your scroll saw or jigsaw skills.
Materials/Tools Needed:
- Plywood or pine board
- Scroll saw or jigsaw
- Sandpaper
- Optional: Paint or wood finish for decoration
- A decorative ornament to hang inside the tree
Estimated Time to Complete:
You can knock this out in about 1-2 hours, making it a quick and easy project for a cozy afternoon.
Pro Tip: To really make your ornament stand out, be sure to use one with high contrast to the finish on your tree! And if you want to give the tree a rustic touch, leave it natural and seal it with a clear finish to show off the wood grain.
3D Wooden Christmas Tree Yard Display
If you’re wantin’ to make a real statement with your outdoor Christmas decor, this 3D wooden Christmas tree is just the thing!
With its two interlocking pieces, this tree stands tall and proud in your yard or garden, adding a festive touch without taking up too much space.
The sleek, modern design is easy to assemble, and the best part? You can leave it plain for a natural wood look or paint it up in bright holiday colors to really catch the eye of passersby!
Skills or Techniques Learned:
You’ll practice precision cutting, working with interlocking pieces, and sanding to smooth the edges. It’s a simple project but oh-so-satisfying to put together.
Materials/Tools Needed:
- Plywood
- Jigsaw or scroll saw
- Sandpaper
- Paint or wood stain (optional)
- Wood sealer (if displaying outdoors)
Estimated Time to Complete:
You’ll need about 2-3 hours, depending on how detailed you get with the finishing touches.
Pro Tip: If you’re planning to keep this tree outdoors, make sure to coat it with a good outdoor sealer to protect it from the weather. And for an extra pop, consider stringing lights around the tree once it’s assembled—it’ll shine brighter than a Christmas star!
Geometric Wooden Christmas Tree
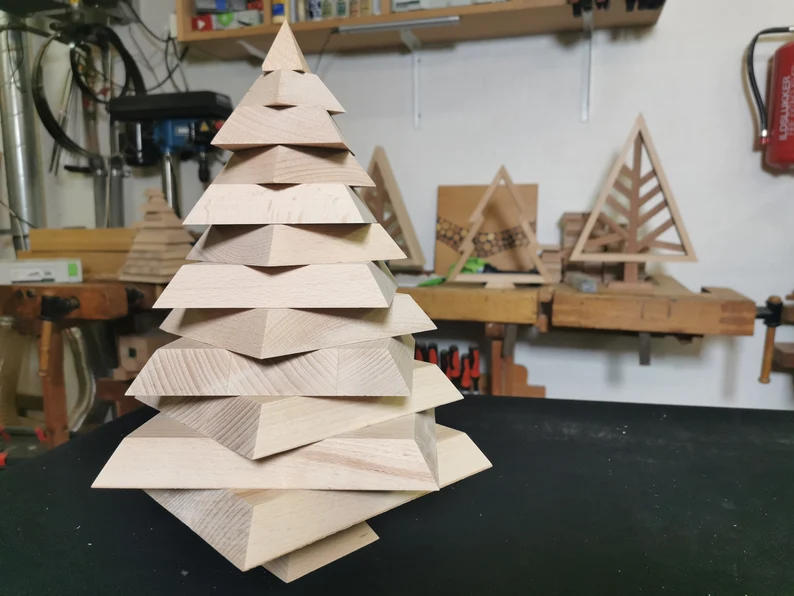
Now here’s a tree that’ll have your friends and family talkin’! This geometric wooden Christmas tree is all about clean lines and sharp angles, giving it a modern, artistic flair.
The stacked triangular pieces create a unique, eye-catching design that can fit right into any holiday decor.
Whether you keep it natural for that sleek, wooden look or paint it up to match your holiday colors, this little tree is sure to stand out as a statement piece in your home!
Skills or Techniques Learned:
You’ll work on precise angled cuts and stacking techniques, which is a great way to hone your fine woodworking skills. Plus, sanding each layer to perfection will make this tree shine!
Materials/Tools Needed:
- Wooden blocks or pieces
- Jigsaw or miter saw
- Sandpaper
- Wood glue
- Optional: Paint or wood finish
Estimated Time to Complete:
You’ll need about 2-3 hours to cut, assemble, and finish this beauty.
Pro Tip: For a more polished look, consider staining the wood in alternating shades. This will give each layer a bit of depth and make the geometric design really pop. Plus, if you’re feelin’ extra fancy, a light coat of lacquer will give it that professional shine!
Modern Outdoor Wooden Christmas Trees

If you’re lookin’ for something simple yet striking to add some holiday cheer to your yard, these modern outdoor wooden Christmas trees are just the ticket!
With their sleek, geometric design, these trees stand tall and proud, giving off that clean, minimalist look that’s all the rage.
They’re lightweight but sturdy enough to withstand the elements, making them perfect for an outdoor display.
Whether you keep ’em plain, paint ’em bright white like snow, or go wild with colors, these trees will turn your yard into a winter wonderland in no time!
Skills or Techniques Learned:
You’ll practice making precise angled cuts and assembling the pieces to stand sturdy. This project is great for working on larger-scale builds while still keeping things simple.
Materials/Tools Needed:
- Wooden boards
- Jigsaw or miter saw
- Sandpaper
- Paint or wood sealer (for outdoor protection)
- Screws or nails for assembly
Estimated Time to Complete:
About 3-4 hours, depending on how detailed you get with the finishing touches.
Pro Tip: For added stability, anchor these trees into the ground using stakes or heavy bases, especially if you’re in a windy area. And don’t forget to seal the wood with a good outdoor sealer to keep ‘em looking fresh all season long!
DIY Spiral Wooden Christmas Tree with Star

If you’re hankerin’ for a tree that’s got a little extra twist (literally) this spiral wooden Christmas tree is just the ticket!
With its fun, swirling design and a star on top, this tree adds a touch of whimsy to any holiday setup.
The spiral slats make it perfect for showing off, and you can get creative with painting it up in festive colors or leaving it natural for a rustic look.
It’s easy to assemble and stands proudly, whether indoors or out in the yard.
Skills or Techniques Learned:
You’ll sharpen your skills on cutting curved and angled pieces, assembling a spiral design, and making sure everything stays balanced. This one’s a fun way to work on your woodworking while adding some holiday cheer!
Materials/Tools Needed:
- Wooden boards
- Jigsaw or circular saw
- Sandpaper
- Screws or nails for assembly
- Paint or wood stain (optional)
- Wooden star for the top
Estimated Time to Complete:
Plan for 3-5 hours, depending on how fancy you get with painting and finishing.
Pro Tip: For an extra festive flair, alternate colors on the slats or wrap twinkle lights around the spiral for a glowing effect! Don’t forget to coat it with outdoor sealant if it’s going outside, so it’ll last season after season!
Wooden Standing Christmas Trees Set

Well, ain’t this just the coziest little display!
This set of wooden standing Christmas trees is perfect for adding a touch of holiday warmth to your home. With their simple, smooth curves, these trees can stand alone or be wrapped in twinkle lights to create a festive glow.
The different sizes make it a versatile display, whether you want ‘em on a shelf, mantel, or even as a centerpiece for your dining table, they’ll fit right in.
And because they’re free-standing, you can easily move ‘em around wherever you need that extra bit of Christmas cheer!
Skills or Techniques Learned:
You’ll practice your precision cutting and assembling interlocking pieces, making sure the trees stand sturdy. A great project to fine-tune your scroll saw or jigsaw skills!
Materials/Tools Needed:
- Plywood or MDF
- Scroll saw or jigsaw
- Sandpaper
- Wood finish or stain (optional)
- Twinkle lights for that extra festive touch
Estimated Time to Complete:
Around 2-3 hours, depending on how detailed you get with your finishing touches.
Christmas Tree Serving Tray

Now, this Christmas tree serving tray is just the thing for those holiday gatherings! Whether you’re using it to serve up treats or just as a festive decoration, this tray is both functional and festive.
Crafted with smooth, clean edges and a routed interior, it’s perfect for holding cookies, nuts, or any holiday goodies.
The tree-shaped design adds that extra bit of holiday flair to your kitchen or dining room. You can even leave it out as a cute decor piece when it’s not in use, versatile and beautiful!
Skills or Techniques Learned:
You’ll practice using a router for precision cuts and smooth edges. This project is also great for refining your sanding and finishing skills to get that professional look.
Materials/Tools Needed:
- Wooden board
- Router
- Sandpaper
- Food-safe wood finish or stain
Estimated Time to Complete:
About 2-3 hours, including finishing and drying time.
Pro Tip: For an extra special touch, try adding a stripe of contrasting wood or inlay to make your tray stand out even more! And remember to use a food-safe finish if you’re planning on serving snacks, gotta keep it festive and safe!
Mini Wooden Christmas Tree Set

Now, if you’re lookin’ for a quick and cute project, these mini wooden Christmas trees are a perfect choice!
Each tree is small but full of rustic charm, making them a great addition to your holiday decor. They’re easy to make, especially if you have a CNC machine, but you can also cut ‘em by hand with a scroll saw if you’re up for it.
These little trees look great as part of a centerpiece, scattered around a mantel, or even given as gifts. Simple, charming, and a whole lot of fun to make!
Skills or Techniques Learned:
This project lets you practice cutting clean shapes, working with small pieces, and adding a beautiful finish. Whether you’re using CNC or cutting by hand, it’s a great project for perfecting your sanding and staining techniques.
Materials/Tools Needed:
- Wooden blocks or boards
- CNC machine or scroll saw
- Sandpaper
- Stain or paint for finishing
Estimated Time to Complete:
About 1-2 hours, depending on how many you make and how detailed you get with finishing.
Starry Wooden Christmas Tree Cutout
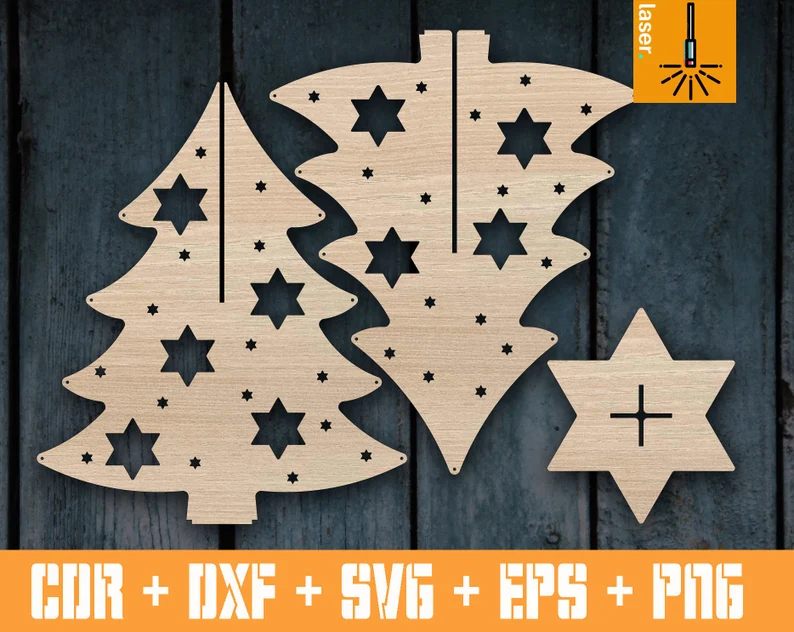
This starry wooden Christmas tree cutout is the perfect blend of simple and festive!
With its lovely star-shaped cutouts and easy-to-assemble design, it’s an ideal project for adding a little holiday cheer to your home.
Whether you cut it by hand or use a laser cutter, this project comes together in no time and makes for a fun and unique decoration.
You can display it as-is, paint it up in festive colors, or even add some twinkle lights to shine through the star cutouts!
Skills or Techniques Learned:
You’ll practice precision cutting, working with templates, and perfecting your sanding skills for smooth edges. It’s also a great opportunity to get comfortable with assembling interlocking parts.
Materials/Tools Needed:
- Plywood or MDF
- Scroll saw or laser cutter
- Sandpaper
- Paint or wood finish (optional)
Estimated Time to Complete:
About 1-2 hours from cutting to assembly.
Pro Tip: For a little extra sparkle, string some fairy lights behind the tree to let the light shine through the star cutouts—it’ll make your display glow with holiday magic! And don’t forget to seal the wood if you’re planning on putting it outside!
Well shoot, after all these wood Christmas tree patterns, I reckon you’re ready to start building your own festive forest!
Whether you go for the modern twist or keep things rustic and homey, each of these projects is sure to add a touch of handmade charm to your holiday decor.
And the best part? You get to say, “I made that!” every time someone asks where you got such a lovely tree.
So, go on and pick a pattern that tickles your fancy, gather your supplies, and get to crafting. Remember, it ain’t about making it perfect, it’s about making it yours. And don’t forget to share your finished trees with us, I’d love to see what you create! Until next time, happy woodworkin’, y’all! 🎄