
WoodItGood is supported by its readers. We may earn an affiliate commission at no extra cost to you if you buy through a link on this page.
Woodworkers, if you don’t know how to use the various types of wood joints available to you, your projects will be a hot mess. We know that sounds harsh, but wood joinery is one of those basic concepts in woodworking that can make or break all types of wood projects.
With so many different kinds of wood joints available, when you learn how to use them properly, you’ll be able to build any type of project you want. And you will be well along the path to being a very skilled woodworker.
So buckle up, and get ready to take a look at some of the more common types of wood joints and how they can be used.
Different Types Of Wood Joints And Their Uses: An Alphabetical List

What Is A Wood Joint?
Just so we are all on the same page here, a wood joint is simply an area where two pieces of wood meet. There are several ways to create these areas, including gluing together with adhesive, screwing into each other, using dowels, etc. And most only require a set of basic woodworking tools.
NOTE: Accurate cutting is the key to crafting any wood joint successfully!
But regardless of which method you choose, there are three main categories of wood joints: butt joints, lap joints, and miter joints. Now, let’s learn about the types of wood joints!
Biscuit Joint
A biscuit joint is created by cutting out a small piece from both sides of the board that is going to be joined. The cutout section is then glued back onto itself creating a pocket for the glue to fill. This creates a strong bond between the two pieces of wood.
What is a Biscuit?
A woodworking biscuit is a small piece of wood used for holding two pieces of wood together while they are being glued. Wood biscuits are typically made from softwoods like pine, cedar, spruce, fir, hemlock, redwood, Douglas Fir, and others.
You will want to get yourself a biscuit joiner tool to make these joints properly and with ease.
Box Joint

Box joints always remind us of the turrets on the top of a medieval castle wall in old movies.
They get their name because they are a really easy way to join wood together to make a box.
Basically, the little squares are cut up and down on the edge of each board to be joined in such a way that they fit into one another forming a clean edge.
This is a visible joint and can be quite lovely depending on the type of wood you are working with.
These joints can be cut by hand but there are router accessories that make it MUCH easier.
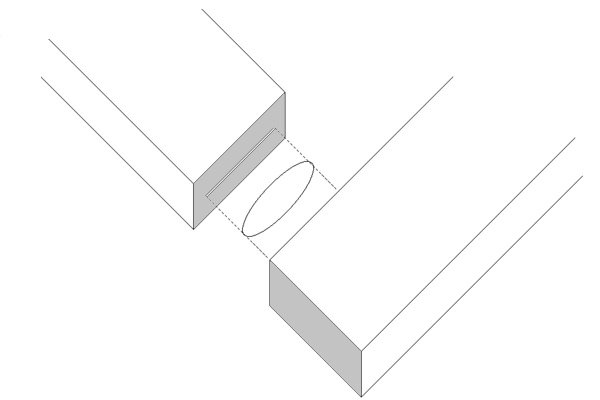
Bridle Joints
A bridle joint is a woodworking joint in which a tenon is cut on the end of one board and a mortise is cut into the other to accommodate it, similar to a mortise and tenon. What makes it different is the tenon and mortise are both cut to the entire width of each board.
Corner Bridle Joint

A corner bridle joint (sometimes called a slot mortise and tenon) connects two pieces at their ends to form a corner. Although some sort of mechanical fastener or pin can be needed, it provides strong compression strength and is fairly resistant to cracking.
Corner bridle joints are a popular method of making workbenches and frames.
NOTE: You can whittle down or shave off wood from this corner joint AFTER it’s been made without losing the joint’s integrity. This makes it especially useful for projects like frames and workbenches where you often need to tweak the shape to make it fit.
T-Bridle Joint

The T-bridle is a version of the bridle joint that connects the end of one member to the middle of another. The tee bridle joint is a sturdy joint that can be used to attach two parts together.
Mitered Bridle Joint
With a mitered bridle joint, both pieces are mitered but one piece of wood has a slot and the piece has a corresponding tenon. Yes, this is much the same as a corner mortice and tenon joint.
The reason you would want to use a mitered bridle is because of all the surface area it gives you to slather wood glue onto. When you do that, it makes for a VERY strong joint without pins of any kind.
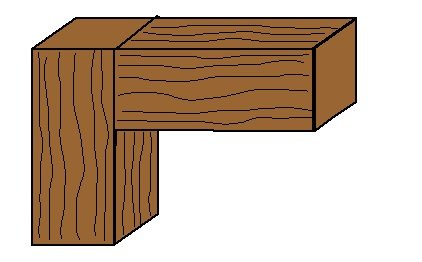
Butt Joints

The basic butt joint is the most common type of wood joint used in building projects. If you think about how 2×4 studs are used to frame house walls you’ll get the idea of this joint type.
When building furniture, or any other woodworking project, most people would agree that the butt joint is probably one of the most simple joints to make and the easiest way to connect two boards together.
Only the most basic tools are needed to successfully craft this type of joint.
Basic Square Ended Joint
The square end butt joint is the simplest and most straightforward way of making 90-degree joints.
That said, it is rarely the strongest or the best option for decorative woodworking projects.
In this type of joint, two pieces of wood butt up against each other, most often perpendicularly.
Since glue alone is not strong enough to make the joint strong, it is usually necessary for the pieces to also be held together with nails, screws, or other types of fasteners to make the joint stronger and more stable.
Edge-to-Edge Butt Joint
An edge-to-edge joint is when two pieces of wood are glued together, along their edges, with no space between them. This creates a seamless look and is one of the most basic of edge joints.
This is typically done when making a panel of wood from several pieces. Cutting boards, for example, are often joined this way rather than being made of one solid piece of wood.
This is not a very strong wood joint and if you are working with wood that is more than a foot long you should consider using an edge-dowel joint, tongue and groove, or a biscuit joint.
Mitered Butt Joint
A miter is another word for an angle cut. A mitered butt joint is when two pieces of wood are cut and joined at an angle.
While the most commonly used miter joints are made with 45-degree angles and joined to form a 90-degree angle, miter butt joins can be cut at any angle. For example, if building an octagon-shaped structure, then you would make each miter cut at 22.5 degrees.
Dado Wood Joint

A dado wood joint is used to join wood perpendicular to one another without needing fasteners like nails or screws. Though, those can also be used if needed for additional strength.
To make a dado joint, you make a groove or slot like a trench running the length of one board that is big enough for the joining board to fit into. They’re commonly found in things like bookcases, cabinets, and bottoms of drawers.
Dovetail Joints

A dovetail joint is one of the most recognizable joints and is widely acknowledged as a sign of professional craftsmanship.
Historically speaking, they are a popular choice for drawer makers.
They’re constructed up of a trapezoidal pattern of interlocking pins and tails and fit together like interlocking puzzle pieces.
You often see dovetail joints in the drawers of fine furniture because of their ability to resist being pulled apart. You can safely think of these as a much fancier and stronger version of a box joint.
Once reserved only for a master craftsman, modern tools have made this joint accessible to almost every woodworker today.
Through Dovetail Joint
The end grain of both boards is visible where the joint is formed in a through dovetail joint, creating a beautiful dovetail look from all sides of the box. A lapped, English or simple dovetail is another name for this extremely strong wood joint.
Half-Blind Dovetail Joint
With half-blind dovetails, half of the joint is visible, so it is called a “half-blind” dovetail. It is nearly as strong as a full dovetail but is used in situations where you need the strength of a dovetail but don’t want it to be seen. An example of this is the drawer fronts.
Sliding Dovetail
Cutting a single tail down the length of a board’s edge and sliding it into a similar pin-shaped hole in the receiving piece of stock creates a sliding dovetail joint.
In many circumstances, it’s a good idea to gently taper the receiving piece’s slot so that the joint is tighter towards the back. This will make it simpler to slide the joint at first but more difficult later on, preventing the joint from separating.
Dowel Joints
Dowel joints are similar to biscuit joints. They are easier for new woodworkers to make because you don’t need any fancy tools. Just a drill to make holes the size of your dowel stock.
The downside of dowel joints is the holes you drill in both pieces of wood need to line up exactly. If they don’t, the two pieces of wood will not line up properly. Use a template (cardboard from a cereal box will do) to make sure your holes are in the right place.
NOTE: Fluted or spiral cut dowels are preferable to smooth dowels since they provide more “grip.” Most hardwood stores provide bundles of pre-cut wood dowels designed exclusively for wood joinery.
Right Angle Dowel Frame Joint
As the name suggests, a right-angle dowel frame joint is used to connect two pieces of wood at a right or 90-degree angle. Depending on the width of the wood being joined one or more dowels can be used.
Edge-to-Edge Dowel Joint

Edge-to-edge dowel joints are a form of edge joints that are used to securely join two pieces of wood side-by-side. Insert dowels every 6, 9, or 12 inches, depending on the length of your project and its required strength. More dowels equal more strength, so think about what you’ll be using your finished project for.
Finger Joint or Comb Joint

A finger joint is a lot like a box joint. The main difference is the edges are not cut in squares but in triangles that look like a saw-blade or an old-fashioned hair comb. And they are used to extend the length of a board rather than turn a corner.
Cutting the “fingers” for this joint can be tricky. You can do it by hand but we recommend you use a special finger/comb router bit. That way you’ll be sure the edges line up correctly.
Once cut, slather glue generously and slide the cut boards together. Be sure to let it dry completely before moving or putting any stress on the joint. Because this type of joint gives a good deal of surface area for glue, it can make for a strong joint.
Some folks don’t care for finger joints because there is no way to hide the zig-zag pattern the joint makes in your wood. From our point of view, this is something to work into the design of your project to give it character. It can even become a focal point!
Half Lap Joint

Half of each of the two boards being joined is cut out to form the half-lap wood joint. When done properly the two boards will join flush with one another on both the top and bottom.
Although this style of wood joinery weakens the strength of both boards, it is a stronger joint than butt joints. Despite its limitations, this sort of wood joint is extremely desirable for a lot of jobs.
Miter Joints
A miter joint is any woodworking joint made by cutting your pieces of wood at an angle to form a corner. This is usually done by cutting both pieces of lumber at a 45-degree angle but any angle larger than 0 is still called a miter.
Miter joints are NOT STRONG by themselves and rely on other methods to strengthen them if they need to stand up to stress or bear weight.
This can be done by combining them with other types of joints (as noted elsewhere in this article) or by using a spline, biscuit, or metal fastener.
Mortise and Tenon Joints

The mortise and tenon joint sounds all fancy but it is just one board with a hole in it and another with a peg or tongue that fits into the hole. The mortice is the hole and the tenon is the peg.
This is an ancient technique and one of the strongest wood joints. It’s been used for literally thousands of years. It is considered to be a “traditional joint” and has been used to build everything from barns to tables.
One thing to remember is to always cut your mortise or hole first. It’s lots easier to make a peg to fit the hole than the other way around. Luckily for you, this is easy to do with something as simple as a saw.
Pocket Joint or Pocket-Hole Joint

A pocket joint is just a screw inserted diagonally through one board and into another. Dowel joints and mortise and tenon joints are comparable to pocket joints.
To avoid cracking the headpiece, the screw path must be pre-drilled to establish a suitable “pocket” for it to set into. While you can “eyeball” this, using a pocket-hole jig makes drilling uniform joints much easier.
The screw is driven thru both boards. The head of the screw will not be exposed or stick up above the board because it will be deep inside the predrilled hole. Although the screw will hold the joint firmly without adhesive, glue will give strength to the joint.
Rabbet Joint

This joint has a funny name, doesn’t it? At first glance, you’ll think it has something to do with Buggs Bunny’s kinfolk! In fact, the word “rabbet” is from old or middle French and means “a recess into a wall”.
So exactly what is a rabbet joint?
The rabbet wood joint is really just a dado cut along the entire edge of a board instead of across the center of it.
Most often, woodworkers will make the same cut across both boards to be joined so that they overlap.
This is called a “double rabbit joint” and is much stronger than one made where the cut is only one-sided.
Glue and pins, nails, or screws are used to secure a rabbet wood joint. You will most often see this type of wood joint along the back of cabinets and places you need a lovely “hidden joint” that doesn’t require a lot of strength.
Tongue and Groove Joint
When you want to join two boards square to each other along their long edge nothing beats tongue and groove joints. You often see this joint used for siding (the interlocking kind), laminate flooring, and even wainscotting.
Ready to learn how to make tongue and groove joints?
A tongue is cut along the edge of one piece of wood and a groove is cut along the adjoining piece in such a way that the tongue glides into the grove along the whole length of the board. The easiest way to do this is with a set of tongue and groove router bits.
Tongue and Groove joints are substantially more durable than edge-to-edge butt joints and are widely used in flooring applications.
Types of Wood Joints FAQ
Which Type Of Joint Do I Need?
The type of joint you need for your project depends on several factors:
- How strong does the joint have to be?
- What size pieces of lumber am I working with?
- Is there any chance of moisture getting between the pieces of wood?
- Will the joint be visible when finished?
- Are there any special requirements regarding finish quality?
- Does my application involve heavy use?
- Am I making an item that needs to last forever?
- What tools do I have?
What are the advantages of lap joints?
The advantages of lap joints are:
- They’re easy to make
- Don’t take as much time to build
- They look great when finished
- Give a uniform thickness to the connected wood pieces
How to join two pieces of wood at 90 degrees?
A miter joint of any kind or butt joint will do the trick.
What is the strongest wood joint?
This depends on what you are building, but all things being equal any version of a mortise and tenon joint is about the best there is.
Especially when one is glued and pinned. You can see evidence of the strength of mortise and tenon joints by looking into ancient structures across the world. A great many of them feature this wood joinery method.
What is the strongest wood corner joint?
This really depends on what you are building and what it will be used for but overall a mortise and tenon joint is the absolute strongest. So if you are building something big, say a post and beam barn, then this is the joint for you.
That said, a box joint is super strong, too. These work well on smaller items like furniture.
photo credit: wikimedia commons unless stated otherwise further up the post.